 NOTE: If you have not yet created a mysql database then you need to Requst a mysql Database be created before you will be able to perform these steps.
Step 1: Login to the MySQL Admin Tool. Remember you will need to use your standard username and the password that you used to create your database. This is NOT the same as your email password.
Step 2: On the initial screen click on your username which should be in the top left corner of the screen.
This is highlighed in Red on the screen image below.
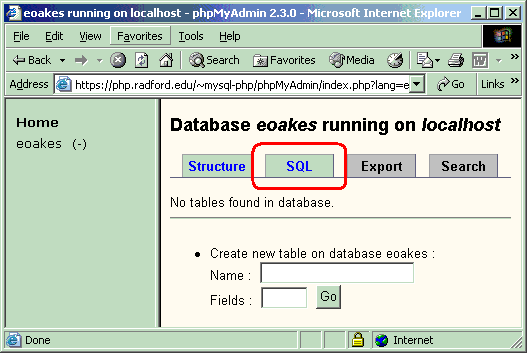
 Step 3: Click on the SQL tab from the tabs at the top of the screen.
This is highlighed in Red on the screen image below.
 Step 4: Copy the below SQL commands into your buffer and then paste them into the window that says "Run SQL query/queries on database username" and then click the GO button on the bottom of the screen.
This will create a Table called "contacts" and insert one record into it for George Bush.
SQL to create contacts table
CREATE TABLE contacts (
first varchar(30),
last varchar(30) ,
street varchar(45),
city varchar(25) ,
state char(2) ,
zip varchar(5)
) ;
insert into contacts
values ('George','Bush','1600 Pennsylvania Avenue','Washington','DC','20500');
Step 5: Create a file called sample.php in your dynamic_php directory that will connect to the database and display the information. The example here uses PHP's "PEAR" functions to provide for greater database flexibility.
<?php

  $dbhost = 'localhost';
  $dbuser = 'username';
  $dbpass = 'YourPassword';
  $dbname = 'username';

  require_once( 'DB.php' );

  $db = DB::connect( "mysql://$dbuser:$dbpass@$dbhost/$dbname" );

  $db->setFetchMode(DB_FETCHMODE_ASSOC);

  $sql = 'SELECT * FROM contacts';

  $demoResult = $db->query($sql);

  while ($demoRow = $demoResult->fetchRow()) {
     echo $demoRow['first'] . ' ' . $demoRow['last'] . '<br>';
     echo $demoRow['street'] . '<br>';
     echo $demoRow['city'] . ', ' . $demoRow['state'] . ' ' . $demoRow['zip'];
  }


?>

NOTE: Be sure you replace username with your
actual username and YourPassword with the password
you entered for set when you created your database.
Step 6: Set the php file permissions properly. IMPORTANT SECURITY INFORMATION. Your goal is to be sure that other users can NOT see the file you just created because it contains the password to your database. For information on setting file permissions, see the Set the permissions on files and directories properly document.
Step 7: Connect to your newly created web site to see if it works. https://php.radford.edu/~username/sample.php


